Dating from 1535, one of the earliest depictions of stringed
instruments being played, comprising violin, viola and cello,
can be found on the cupola of the church of the Madonna di Miracola
in Saronno, Italy. The oldest surviving violin, known as the Charles
IX, so named after the French king who ordered it from the Cremonan
craftsman, Andreas Amati, dates from 1560. The end of the 17th.
century and the early 18th. century saw stringed instruments develop
to the form we know today. Indeed, the first serious textbook
for the cello was published in 1741. The composer, Joseph Haydn
(1732-96) was a leading figure in the development of the classical
string quartet, comprising two violins, viola and cello, as a
sophisticated form of chamber music. Haydn's writing for such
ensembles often displayed a “dialogue character” with
the various instruments answering each other. Following Haydn’s
lead, other composers such as Mozart, Beethoven and Schubert,
wrote for the ensemble. Initially, the players would be principal
musicians of an orchestra but during the second half of the 20th.
century, it became fashionable for separate ensembles to be formed.
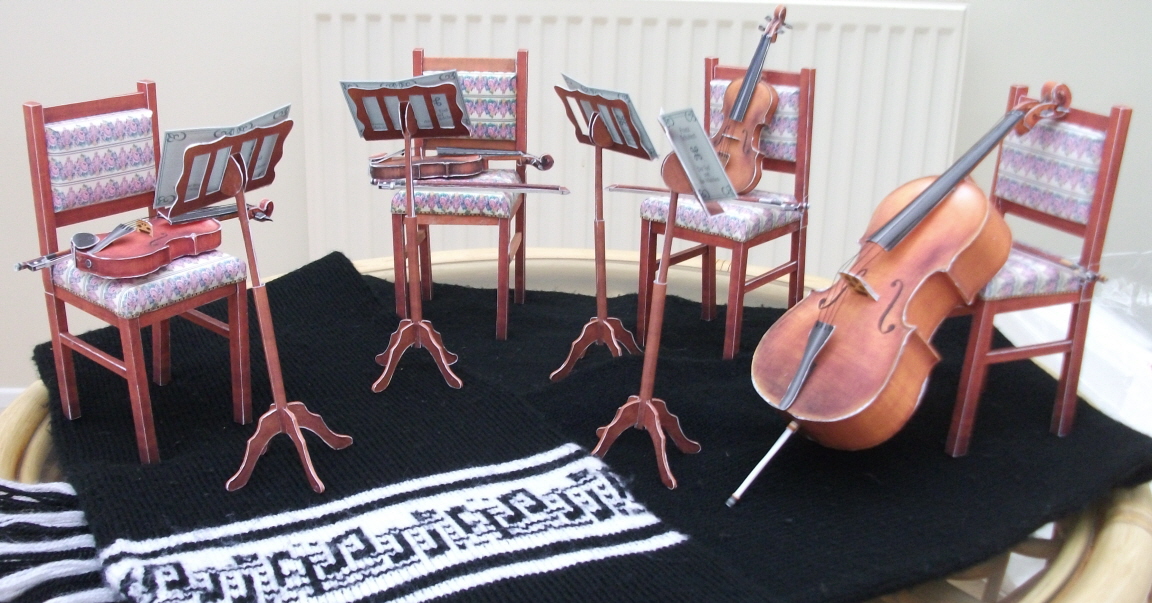
The model, the parts and instructions for which are printed on
7 A3 sheets of card, consists of four instruments – cello,
viola and two violins, together with bows, chairs and music stands
for the four players. The kit is thus built into sixteen different
models. I decided to proceed set by set, making an instrument,
bow, chair and stand for each player. I usually made the instrument
with the bow and, as these neared completion, started on the chair
and then the stand.
Building the violin begins with an internal framework. This includes
the peg-box in the violin neck in which there are holes for the
four pegs for tightening the strings. The holes have to be made
through thick card and it is suggested that a hole-punch is used.
I tried cutting them out but the result was not very satisfactory.
The size of the hole (1.5mm.) is too small for most hole-punch
sets, but eventually I found a set on the internet which cost
about £4. The set had a handle into which any one of six
different sized punch-bits could be screwed. With trial and error,
I found that the best way to use this was to place the part to
be pierced on a metal plate such as a steel ruler, and then to
hit the punch hard with a hammer. I found it best to punch the
holes out before cutting the neck part out. The completed framework
is then glued to the violin back. The side of the sound box then
has to be glued to the back. This is quite tricky as the side
must fit the curves of the violin. Then the top of the sound box
is glued in place on the side. The neck is then completed with
the wood-effect laminates and the finger-board is added. The tailpiece,
to which the strings are attached at the bottom of the instrument,
is cut out and holes pierced in it to take the four strings. I
threaded lengths of thread through the holes before positioning
the tailpiece on the violin. To make the pegs to which the strings
are to be attached, I used cocktail sticks. I cut these to length
and painted them black. When the paint dried, I attached the peg-head
and inserted the peg into the peg-box; the fit was such that I
did not need to glue it. For the cello, where the pegs were more
exposed, I glued the strings to each peg and could probably tighten
the string (I didn’t try!). For the strings on the violins
and viola, I just put glue onto the neck and pushed the string
thereon. When the glue had dried, I trimmed the excess string.
The bow comprises a core of two thicknesses of the stiff card
provided. This is covered with wood-coloured card which reaches
round the bow. Apart from the tip of the bow, which has some double-curvature,
the construction is straightforward.
The chair has a number of spars to make the legs and framework.
These are simple to make but care must be taken to ensure that
each is correctly labelled so as to be used in the right place.
In some cases, I wrote the part number on a white tab. Care should
be taken especially on the back so that it is constructed the
right way round, leaning back slightly on the chair. Also, when
making the seat frame, it is necessary to ensure that the faint
dotted lines on the frame spars, which denote the positioning
of the cushion, are located on the outside of the frame.
The music stand, again, is quite straightforward. The feet are
made of two thick pieces of card which are slotted together. The
cut edges are then covered with wood-coloured strips which went
on very well. The music stand upright consists of two cylindrical
parts, one fitting inside the other to allow height adjustment.
However, there is no provision for holding the upright in an extended
position in the model, but there appeared to be no need to adjust
the height.
The model is fairly straightforward, apart from the instruments
which are quite tricky. Having completed the model, I arranged
the sixteen pieces, topped off with four miniature scores, into
a semi-circle. The effect was, quite simply, delightful. The subject
is unusual for a model but the end product was well worth the
construction effort.