The Praga Corporation has its origins in the early years of the
20th. century when the Prague Automobile Factory was established
in 1907 by the First Czech-Moravian Machine Factory and the Frantisek
Ringhoffer company. Initially building cars under licence from
Italian and French manufacturers, the company grew with diversification,
inter alia, into the production of commercial vehicles and the
invention of an alternative fuel. During WW2, much of the factory
was destroyed and, with the arrival of the Communist government,
the company was brought under state control. After a short-lived
attempt to resume car production, the company decided in 1948
to concentrate on the commercial vehicle market. In 1952, the
Praga V3S off-road truck came off the production line. After the
collapse of Communism, the status of the company changed, becoming
a stock company in 1992, when production of the multi-purpose
UV80 lorry began.
The Praga UV80 is a four-wheel drive truck with excellent driving
qualities in off-road conditions. With its own 8-speed (4 forward,
4 reverse) Praga gearbox and powerful Deutz 125kW engine, the
UV80 has been very successful in the popular field of truck trials,
winning its class in the 1997 Europa Truck Trials. The truck also
boasts a hydraulic system which allows the operation of various
attachments at either end of the chassis as well as between the
axles. The truck is, therefore, very suitable for use in repair
and maintenance of roads and road equipment, in civil engineering,
geological work, agriculture, forestry, repair and maintenance
of railways, pipeline control and for passenger transport in rough
terrain.
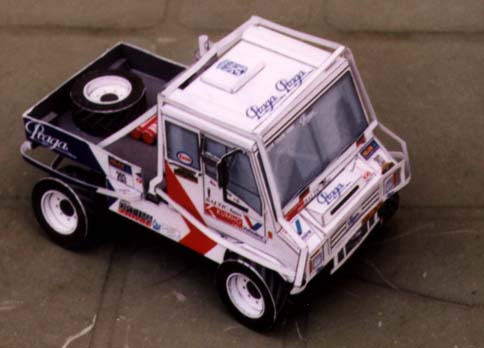
I have not made many vehicle models before and the UV 80 appealed
as it was an unusual subject. The model depicts the 4.5 tonne
off-road trials truck with short 4.64m wheelbase and open flatbed
back. The 1:32 scale model kit is classed as difficulty grade
3 on a scale of 1-5, so I felt it would be a reasonable challenge.
The kit has no English instructions, but there is an exploded
diagram, very typical of Czech models, which seemed to make everything
clear. The kit is well printed on good quality card which I found
well suited for modelling. The card sheets look rather daunting
with the parts crammed tightly together, another feature of Czech
kits. However, the use of line codes is quite extensive and explains
not only the scoring but also indicates which parts are glued
to which.
To begin, I looked at the Czech instructions to see which part
numbers were mentioned first in order to know where to start.
This led me to the cab which I cut out and put together. Thence
I left the instructions behind as I decided to tackle the flatbed.
I found the detail very pleasing, even to the extent of recessed
rear light clusters. The back nearing completion, it was time
to start thinking about the chassis on which cab and back were
both to be mounted. The central part of the chassis is a long,
thin box and so care must be taken to ensure that this does not
become warped in construction. Onto the basic chassis can be fitted
various attachments including fuel tanks and engine. The latter
sits underneath the cab which is hinged to the chassis, allowing
it to tip forward. Disappointingly, when I came later to stick
on the two side panels, these were glued to both the open back
and the cab. Thus, the cab cannot be tipped forward and the engine
remains hidden on the finished model. However, for authenticity,
it is still there!
Next it was time to tackle the wheel assemblies. I had already
made the spare wheel which sits in the open back and which comprises
7 parts. A feature of this and many other Czech vehicle models
is the movement and tracking of the wheels. The wheel assemblies
were thus among the more demanding parts of the kit. I started
with the rear assembly and used styrene pins, cut from rod, as
axles. Careful application of glue ensured that the wheels rotated
when complete. The front wheels were made to rotate and also to
track, so I used more styrene pins to attach the tracking mechanism.
Having fixed the wheels to the axles, I had then to position the
connecting rod. For some reason, this was slightly longer than
was necessary; whether by design or due to a mistake in construction
on my part, I could not tell, probably the latter. Anyway, to
correct the mistake, I cut the connecting rod and, by trial and
error, glued the two parts together at the right length. The result
is quite effective although the wheels tend to bind when rotating.
In retrospect, when assembling the wheels and hubs, I should have
allowed a greater degree of play. The model is finished off with
anti-roll bars, driving mirrors, number plates and towing brackets.
I thoroughly enjoyed making this model. It is a handy size, yet
sufficiently detailed to provide a satisfactory challenge. The
quality of the printing and draughtsmanship is very high and,
although there are no English instructions, the diagrams and the
excellent line codes make the construction process easy to follow.
Christopher Cooke.